
The right Amazon flat file depends on one first choice: are you uploading data or exporting it? If you need to create or edit listings, use an upload template. If you need to review live catalog data before a bulk change, use a report. That one decision can cut upload issues and help protect live listing data.
Here’s the short version:
- Use a category-specific template for new ASINs, attribute edits, and variation setup.
- Use the Category Listings Report to export live listing data for audits, backups, and bulk edit prep.
- Use Inventory Loader (Lite) for simple offer changes like price, quantity, and fulfillment channel.
- Use PartialUpdate for existing listings so blank cells don’t clear live fields.
- Download a new copy of the file before each job, because Amazon updates templates multiple times per year.
- Test 1–2 SKUs first and review the feed-processing report after upload.
- Save backup copies and label them with the marketplace and date, such as 06/28/2026.
Amazon bulk files can change thousands of listings in one upload. That’s why file choice matters more than most sellers expect. One wrong template, one bad category match, or one full update with empty cells can wipe bullets, descriptions, or images.
Amazon Flat Files Full Guide 2023 – Filling Out Parent-Child Variations & Fixing Listing Issues
sbb-itb-ed4fa17
Quick Comparison
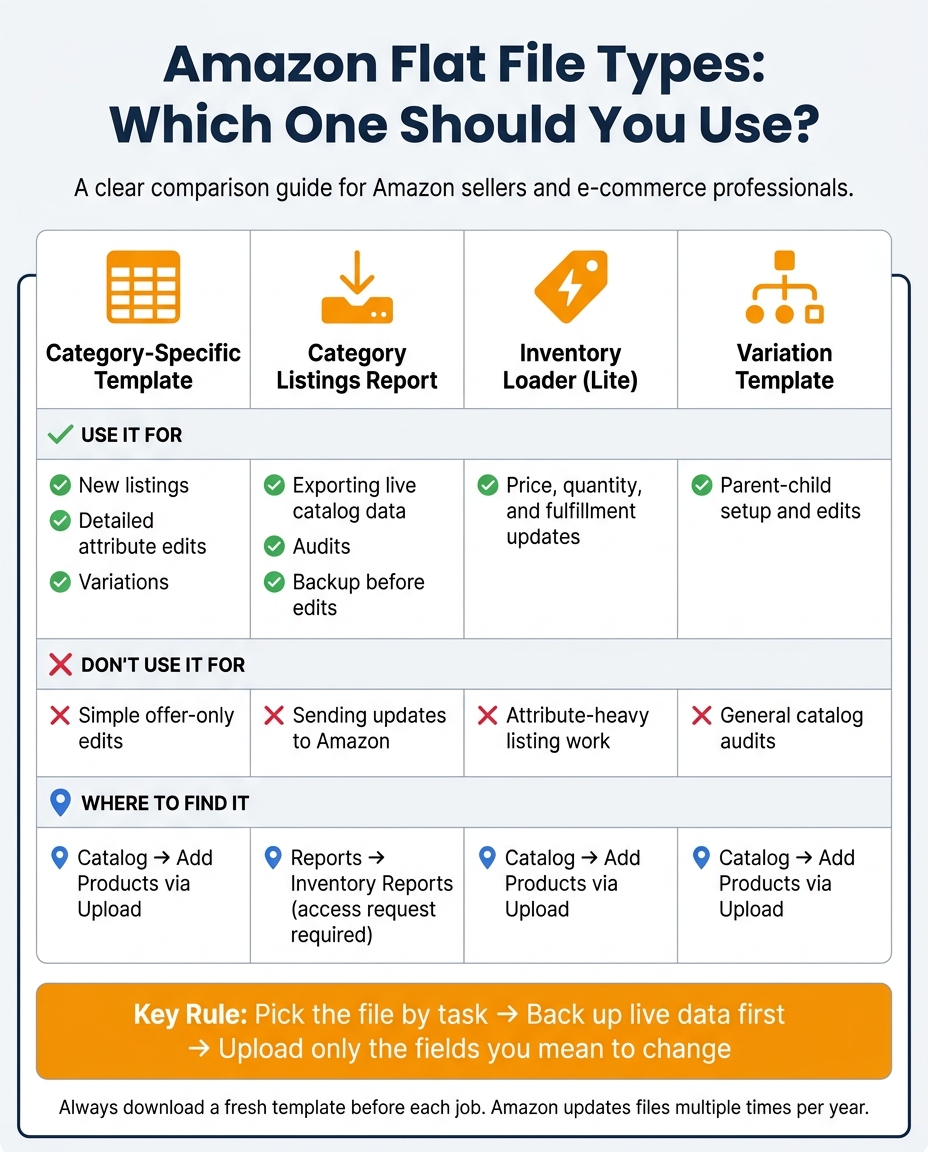
Amazon Flat File Types: Which One Should You Use?
| File | Use it for | Don’t use it for |
|---|---|---|
| Category-Specific Template | New listings, detailed attribute edits, variations | Simple offer-only edits |
| Category Listings Report | Exporting live catalog data, audits, backup before edits | Sending updates to Amazon |
| Inventory Loader (Lite) | Price, quantity, and fulfillment updates | Attribute-heavy listing work |
| Variation Template / variation fields | Parent-child setup and edits | General catalog audits |
I’d sum it up like this: pick the file by task, back up live data first, then upload only the fields you mean to change. That’s the cleanest way to handle Amazon bulk listing work without avoidable mistakes.
Where to find flat file downloads in Seller Central
Go to Catalog → Add Products via Upload for templates
This is the starting point for upload templates. In Seller Central, go to Catalog → Add Products via Upload, then open Download an Inventory File. From there, you can search for your category or browse the category tree.
After you pick a category, choose the template level that fits the job. A Required template includes only the fields Amazon must have. All and Advanced include more attributes, which helps when you need tighter control over listing details.
When you’re set, choose the version you want and click Generate Template to download the spreadsheet.
Use a new copy each time before you start editing. Amazon updates these templates several times a year [3][1].
Go to Reports → Inventory Reports for inventory exports
This is the right place for live catalog exports. Go to Reports → Inventory Reports, choose the report type, and click Request Report. When the status changes to Ready, the Download button appears.
If you need the Category Listings Report, you must get access first. In Seller Central Help, search for "Category Listing Report" and submit the access request [4][5]. It makes sense to request access shortly before a catalog audit or bulk edit, so the report doesn’t expire before you use it.
Once you know where these files are, the next move is picking the right one for the listing task.
How to pick the right file for your listing task
Use the table below to match the file to the job before you download anything.
| File Type | Best Use Case |
|---|---|
| Category-Specific Template | Creating new ASINs; detailed attribute edits; setting up variations |
| Category Listings Report (CLR) | Auditing live catalog data; fixing suppressed listings; preparing bulk edits |
| Inventory Loader (Lite) | Quick price, quantity, or fulfillment channel updates |
| Variation Template | Building parent-child families, such as apparel size/color variations |
The next sections help you narrow the choice by task: create, export, or update.
Use a category-specific inventory file template for new listings or detailed edits
Pick the exact leaf category, not a parent category. That way, Amazon includes all required fields for your product type. If you choose the wrong category, the file can leave out required fields and trigger Error 8541. The template also includes a Valid Values tab that shows Amazon’s accepted terms for controlled fields [3][2].
If your next step is to check or revise live listings, use a report instead.
Use the Category Listings Report to export existing listing data
The Category Listings Report exports the live data Amazon stores for your listings [4][7]. It’s the right pick when you need to see what Amazon accepted, what it ignored, and where listing data may be missing or wrong.
If you only need simple offer changes, move to the Lite loader or a variation template.
Use Inventory Loader (Lite) for offer updates and variation templates for parent-child families
For offer-level changes like price updates, quantity changes, or switching the fulfillment channel, Inventory Loader (Lite) is the faster option. It works across categories and doesn’t require category-specific attributes [3][2].
If you need to build or manage parent-child relationships, use a category-specific template with variation fields like parent_sku, relationship_type, and variation_theme [3][2]. And if you’re removing variations, delete child SKUs before deleting the parent SKU to avoid catalog corruption [4].
How to download and prepare a flat file without common errors
Confirm the category, marketplace, and variation theme before editing
After you download the right file, pause for a quick check before you touch the Template tab. Make sure the marketplace and category match what you plan to update. If you’re using a variation file, confirm the variation theme too.
Always grab a fresh copy of the template right before you start. Amazon updates required fields and validation rules often, so an older file may already be out of date [3][1].
Once you open the workbook, review the Instructions, Data Definitions, Valid Values, and Example tabs before editing the Template tab. Data Definitions tells you whether a field is required, preferred, or optional, and it also shows character limits. Valid Values lists the exact terms Amazon accepts for controlled fields, so copy those entries exactly [1][3][6].
Export existing catalog data before making bulk changes
If you’re changing live listings instead of making brand-new ones, download a Category Listings Report (CLR) first. Think of it as your safety net. It gives you a backup of the live catalog data Amazon currently has for those listings [4].
This matters even more for large catalogs. If you run a full update and leave cells empty, Amazon can wipe existing fields like bullets, descriptions, or images [2][4]. Use the CLR to compare your live data before uploading changes.
Fill out, save, and upload the spreadsheet correctly
Edit only the Template tab. Don’t rename header columns, move them around, or delete them. Even small changes there can cause the file to fail schema validation [2].
For existing listings, use PartialUpdate in update_delete so Amazon changes only the fields you fill in [1][4].
A few file-handling rules help avoid common flat file errors:
- Save the file as .xlsx or tab-delimited .txt
- Skip CSV if your data has commas, because columns can shift and trigger upload errors [1][6]
- Test one or two products first, then upload the file and download the feed-processing report to review warnings [1][6][2]
That last step matters more than many sellers think. A successful upload message doesn’t always mean every field changed the way you expected. The feed-processing report is the best place to catch warnings or quiet failures [2].
For version control, keep a duplicate of each upload file and include the marketplace and upload date in the file name. Use U.S. date format, such as 06/28/2026 [2].
Conclusion: Choose the right Amazon download for faster bulk catalog work
Choosing the right Amazon flat file comes down to one simple call: template or report.
Match the file to the job. Use a category template for new listings or attribute edits. Use Inventory Loader for price or quantity updates. And use variation templates when you need to set up parent-child relationships.
Start with a fresh template. Then back it up with a Category Listings Report. Edit only what changed, and check the processing report before you upload again.
Pick the right file first, and bulk catalog work gets faster, cleaner, and a lot less messy.
FAQs
Which Amazon file should I download first?
Download a category-specific inventory file from Amazon Seller Central before any bulk update. In Catalog or Inventory, select Add Products via Upload, then use the product classifier tool to get the matching template.
If you want to check your current live listing data first, download a Category Listing Report to use as a baseline. Use a new file each time, since old templates often lead to upload errors.
Can I use one flat file for every category?
No. Amazon uses a category-specific inventory template for each product type. Each template has its own required fields, validation rules, and accepted values.
Different categories need different columns. So if you use the wrong file, Amazon may reject the upload or leave out product data.
The safe move is simple: pick the exact leaf category in Seller Central before you generate the template. That helps you get the right file for that product.
What happens if I upload blank fields?
If required fields are left blank, your flat file upload will fail.
Amazon treats some fields as mandatory, including SKU, product ID, price, and brand name.
Optional fields, like search terms or bullet points, can be left empty without causing the upload to fail.
To spot required fields, check the Data Definitions tab or look for fields marked with an asterisk or bold text.