
If you download the wrong Amazon flat file, your upload can fail before you add a single product.
When I look at this process, the answer is simple: use the file that matches your task, your exact product type, and Amazon.com. For U.S. sellers, that means getting the latest template from Seller Central, picking the right category path down to the leaf node, and checking the tabs that tell you which values Amazon accepts. In some categories, templates can run past 400 columns, so one wrong file can waste a lot of time.
Here’s the short version:
- I use category-specific templates for:
- new ASINs
- parent-child variations
- bulk attribute edits
- I use Inventory Loader for:
- price updates
- quantity updates
- handling-time edits
- I confirm the marketplace is Amazon.com
- I download a current file instead of reusing an old one
- I check the Instructions, Data Definitions, and Valid Values tabs before editing
- If I’m unsure about product type, I use the Browse Tree Guide (BTG)
A few common mistakes cause many upload issues:
- using Inventory Loader for variations
- picking a file from the wrong marketplace
- choosing the wrong leaf node
- typing free text where Amazon wants fixed values
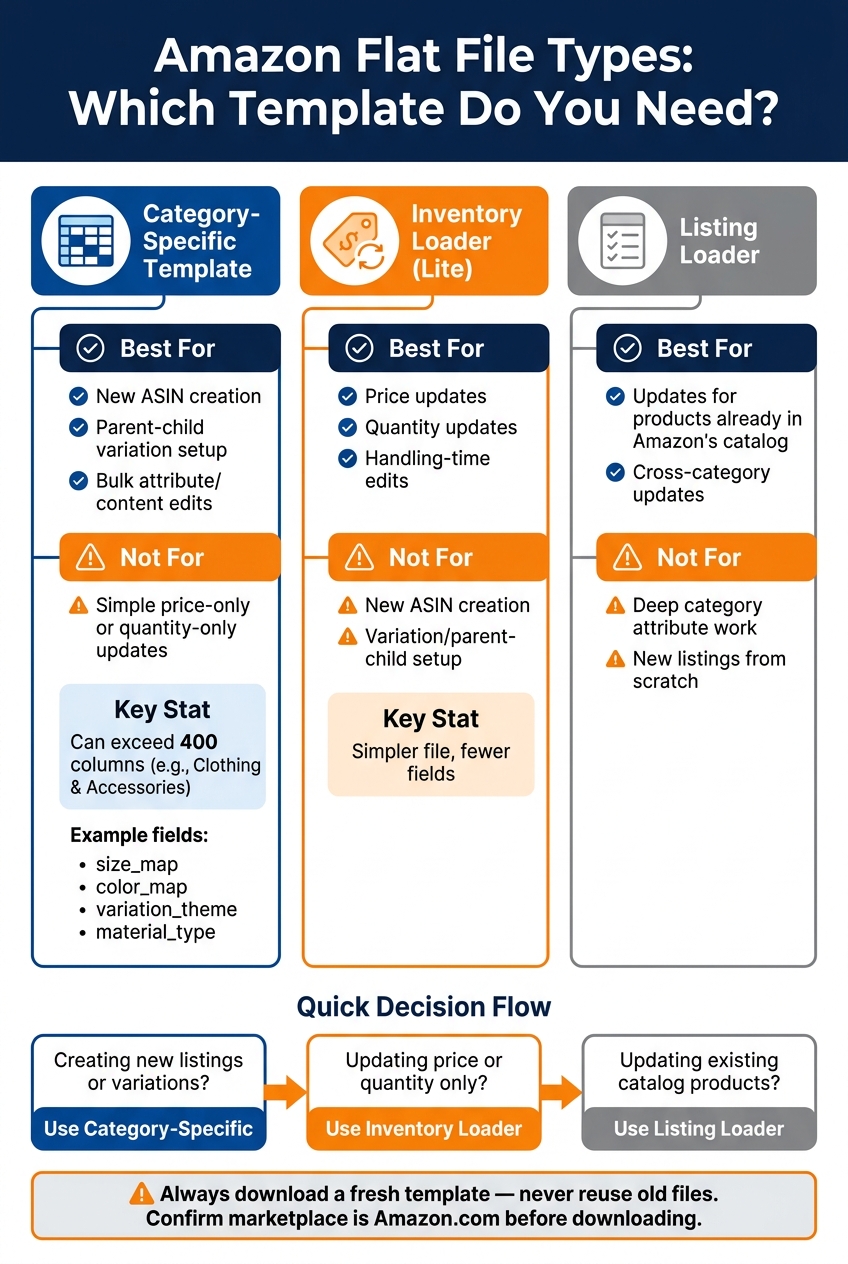
Amazon Flat File Types: Which Template Do You Need?
How to Download and Use a Flat File for Bulk Upload in Amazon Seller Central | Step-by-Step Tutorial

sbb-itb-ed4fa17
Quick Comparison
| File type | Best use | Not for |
|---|---|---|
| Category-Specific | New listings, variations, attribute changes | Simple price-only or quantity-only edits |
| Inventory Loader | Price, quantity, and handling-time updates | New ASIN creation and variation setup |
| Listing Loader | Updates for products already in Amazon’s catalog | Deep category attribute work |
In other words: choosing between an Amazon flat file vs. Inventory Loader decides how smooth the rest of the job will be. I’d treat template choice as the first quality check, not a small setup task.
Know Which Amazon Flat File You Actually Need
The next step is picking the file type that fits the job. To do that, you need to know the template type before you download it.
When Flat Files Make Sense
Flat files make the most sense when you’re working with multiple ASINs at once. If you’re below that level, Seller Central is often the faster option [5].
Flat files are a good fit for:
- Launching new ASINs in bulk
- Setting up parent-child variations
- Adding compliance-heavy data
- Updating price and quantity in bulk
Main Template Types in Seller Central
Not all flat files work the same way. Amazon publishes different templates for different jobs, and picking the wrong one can burn time before you’ve entered a single cell.
| Template Type | Use It For |
|---|---|
| Category-Specific | New ASINs, parent-child variations, and bulk attribute updates [2][3] |
| Lite / Inventory Loader | Price and quantity updates, plus basic operational adjustments like handling time [2][1] |
Category-specific templates include the most data fields. A Clothing & Accessories template, for example, can run past 400 columns and is required when you’re creating a new listing from scratch or adding rich attribute data to current listings [2]. Use category-specific templates when you’re creating or enriching listings, and use Lite templates for price and quantity only [2][1].
Next, go to the Seller Central download page and match the file to your marketplace.
How to Find the Flat File Download Page in Seller Central
Once you know which template type you need, head into Seller Central and open the download page. It’s easy to get to, but the menu path can change a bit depending on the layout you see.
You can use either of these routes:
- Inventory > Add Products via Upload > Download an Inventory File [2]
- Catalog > Add Products > "I’m uploading a file to add multiple products" [4]
Both routes lead to the same template download page. If your Seller Central layout looks a little different, use the search bar at the top and type Add Products via Upload to get there faster [2][6].
After you land on the page, double-check the marketplace and then pick the tool that fits the listing job you’re doing.
Confirm the Marketplace First
Before clicking deeper into the page, look at the marketplace switcher in the Seller Central header. It should say Amazon.com.
That step matters because required fields can change by marketplace [2][4].
Identify the Template Options on the Page
On the download page, you’ll see a few template choices. Each one serves a different job, so picking the right one saves time and cuts down on common upload errors.
| Tool | What It’s For |
|---|---|
| Category Search / Browse | Generates a custom template for a specific product type and is the main option for new listings |
| Inventory Loader | A simpler file for updating price and quantity on existing listings |
| Listing Loader | Used for existing catalog products across categories |
For new listings and attribute updates, use Category Search / Browse. Once you open that option, the next move is to choose the exact product type. From there, match the tool to the product type you’re listing.
Select the Right Product Type and Generate the Template
From the download page, go all the way down to the exact product type before you generate the file. That step sounds small, but it has a big effect on whether your upload works cleanly.
Once you open the template generator, narrow the selection to the precise product type tied to your item.
Match the Template to Your Product Category
A lot of upload issues start with one simple mistake: picking the wrong product type. Amazon sorts templates by Department > Subcategory > Product Type. You need to drill down to the most specific category level, or leaf node, to get the right required fields [2].
You can use the search box on the download page and type in your product type, or browse the category tree until you reach the leaf node that matches your item [5][2]. The difference can be pretty dramatic. For example, a Clothing & Accessories template can have more than 400 columns and include fields like size_map, color_map, and variation_theme, while a Home & Kitchen template often has 200–300 columns and includes fields like material_type and finish_type [2]. In plain English: use the template built for the exact category you plan to list in.
If you’re not sure which leaf node fits your product, download the Browse Tree Guide (BTG) from Seller Central. It links each browse node to the correct Item Type Keyword, and that keyword should come from the BTG, not from a free-text search you made up on the spot [3].
After you confirm the leaf node, pick the file type that fits the job.
Choose the Right File for the Task
Use category-specific files for new listings, variations, and attribute edits. Use Inventory Loader only for price, quantity, or handling-time updates.
| Task | Template to Use |
|---|---|
| New ASIN creation | Category-Specific |
| Variation setup (parent-child) | Category-Specific |
| Bulk content or attribute edits | Category-Specific |
| Price or quantity updates only | Inventory Loader |
Download the Latest Version and Check It Before Editing
Before you start editing, make sure you downloaded the current template. Open the .xlsx file and review the Instructions, Template, Data Definitions, and Valid Values tabs [2][5].
The Data Definitions tab tells you which fields are required for that category. The Valid Values tab shows the exact terms Amazon accepts. Those fields use picklists, not free text, so typing your own version can trigger common upload validation errors [2].
Amazon changes templates often, so don’t reuse an old file [2][3]. Save the file with the category, marketplace, and date in the filename. For example: Apparel_US_Template_2026-06-27.xlsx. That makes it much easier to see which version you’re working on [5].
Common Download Mistakes to Avoid and How to Manage Updates at Scale
Mistakes That Cause Upload Errors Before You Even Start
After you download the template, a lot can go wrong before you add even one row of product data. The most common slipups are simple: using the wrong file, pulling a template from the wrong marketplace, or reusing an old version. Any one of those can trigger upload errors right out of the gate [2][3][6].
Two mistakes cause trouble again and again.
- Using Inventory Loader for variations. It doesn’t support that task [2].
- Ignoring the Instructions and Valid Values tabs in the
.xlsxfile. Those tabs show the exact terms Amazon allows, and unsupported abbreviations can trigger a validation error [2][6].
This is one of those cases where the boring details matter. If Amazon expects a specific value, even a small shortcut can throw the whole file off.
How FlatFilePro Fits After the Initial Download
Once the template is downloaded, the job shifts from setup to repeat updates. That’s where FlatFilePro comes in.
FlatFilePro connects straight to Amazon Seller Central through API, which lets you handle catalog edits at scale without doing all the work by hand in spreadsheets.
Conclusion: Get the Download Right to Avoid Bigger Catalog Problems
The pattern is pretty clear: the download step sets the tone for everything that follows. Use the right marketplace, the right file type, and a current template – then start editing.
FAQs
How do I know which product type to choose?
In Seller Central, go to Add Products via Upload and use the search or browse tool to find the category that fits your item. Search with specific keywords, or click down through the category tree until you land on the exact product type.
Pick the most specific product type you can. That choice determines the required attributes, validation rules, and template columns you’ll get. If you’re not sure, don’t default to a broad category – it can create extra work later.
Can I reuse an old Amazon flat file template?
No. Don’t reuse an old template.
Amazon changes its file requirements often. That can include new required fields, new validation rules, and columns that no longer work.
If you use an outdated file, you can run into:
- Upload errors
- Catalog mismatches
- Missing or rejected data
The safer move is simple: download a new, category-specific template from Seller Central each time you create listings or run a bulk update.
You can still keep older files for your own records. Just don’t use them for new uploads.
What should I do if my upload fails right away?
Go to Add Products via Upload in Seller Central and open your submission history. Find the file you submitted, then use the Actions menu to select Download Processing Summary. That report gives you the Batch ID and the error codes tied to the upload.
Use the report to spot what went wrong. In most cases, the issue is a missing required field or a formatting error.
After that:
- Download a new template before you resubmit
- Test your fix with a small batch of 10 to 20 SKUs
That small test run makes it much easier to catch problems before you upload the full file.