
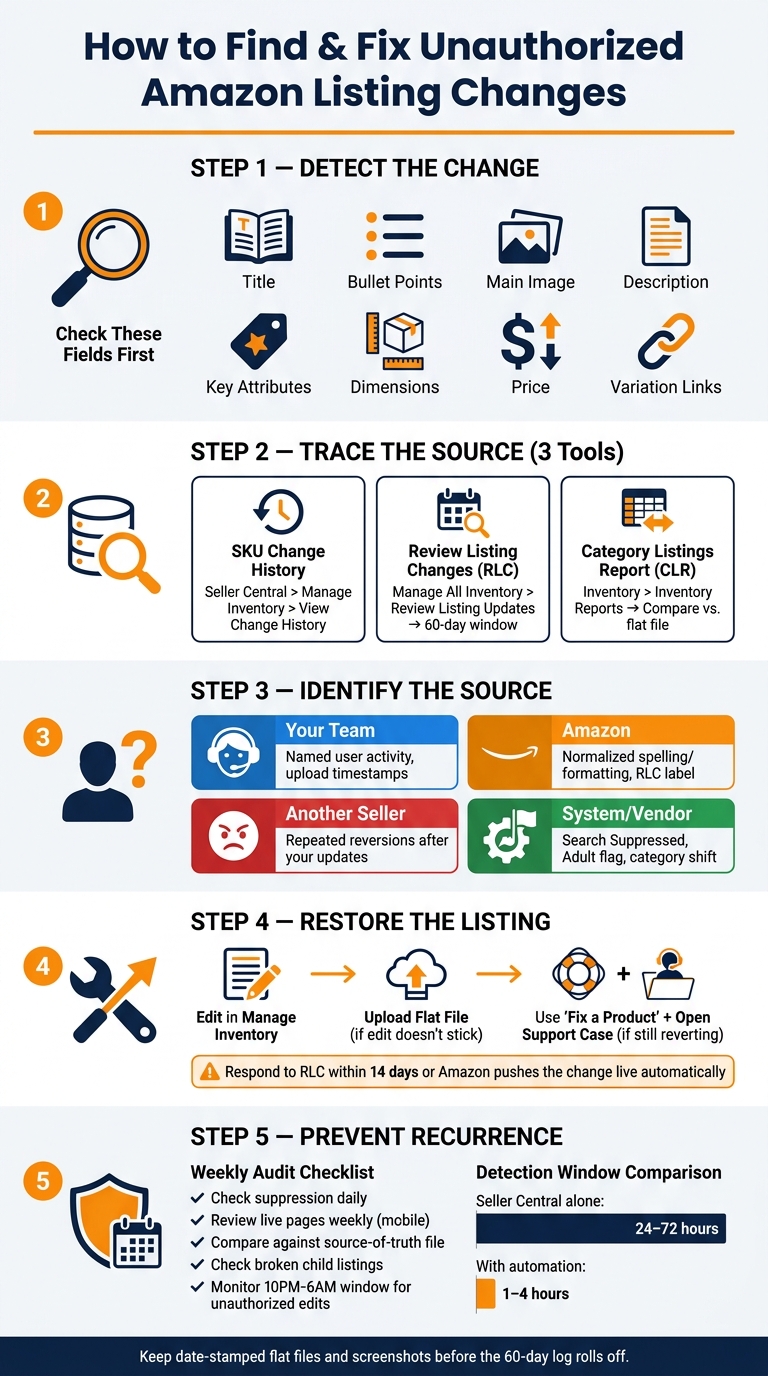
If your Amazon listing changed and your team didn’t touch it, I’d check three places first: Seller Central history, Review Listing Changes, and my last flat file. That gives me the fastest way to see what changed, when it changed, and who likely caused it.
Here’s the short version:
- I start with the fields that can hurt traffic or sales fast:
- title
- bullet points
- main image
- description
- key attributes
- dimensions
- price
- variation links
- I check SKU history in Seller Central for recent edits.
- If I’m in Brand Registry, I review Amazon-initiated changes in the 60-day Review Listing Changes view.
- I compare the live page against my last saved flat file and a Category Listings Report.
- Then I sort the source into one of four buckets:
- my team
- Amazon
- another seller on the ASIN
- system or Vendor conflict
- If the fix doesn’t stick, I reupload by flat file, use Fix a Product, and open a support case with proof.
A few details matter. Some history views miss edits like images, browse nodes, and some manual changes. And if I don’t respond to Review Listing Changes within 14 days, Amazon can push the update live by default. That’s why I keep date-stamped files and save screenshots before the log rolls off.
The goal is simple: confirm the edit, trace the source, restore the right content, and keep a weekly check on high-risk ASINs so the same problem doesn’t hit again.
How to Find & Fix Unauthorized Amazon Listing Changes
Amazon AI Listing Changes Auto Publish After 14 Days
sbb-itb-ed4fa17
Check SKU-Level Listing History in Seller Central

Seller Central’s SKU history helps you confirm what changed, when it changed, and where the edit came from. It’s the first place to look when a listing shifts and you need the paper trail. That said, the built-in log only shows recent SKU edits, and it doesn’t cover every kind of change.
How to Find Change History in Manage Inventory
Go to Inventory > Manage Inventory (or Manage All Inventory), find the SKU you’re checking, click the dropdown arrow next to Edit, and choose View Change History [1][6]. That opens the change log for that SKU.
If you’re brand-registered, there’s another place to check: Manage All Inventory > Review Listing Updates. The Review Listing Changes dashboard is meant to show Amazon-initiated edits from the last 60 days [2][3].
If the SKU log feels incomplete, don’t stop there. Compare Amazon’s review tools with the last file version you submitted. That side-by-side check can help you spot what the history log missed.
How to Read the Change Log for Titles, Bullets, Images, Pricing, and Variations
The log is shown in chronological order. You may see the field that changed, the old value, the new value, and the timestamp. If the live detail page doesn’t match the log right away, check both before you assume the record is off.
For pricing, use the Pricing Health Dashboard. Standard inventory history may not include price edits [1].
What Seller Central History Does Not Show You
This history has some clear blind spots. Manual edits made right in Manage Inventory may not appear in exportable history [7]. The Review Listing Changes dashboard also leaves out images, browse nodes, and normalization edits [3]. On top of that, changes from other sellers or Vendor Central conflicts may be missing from the standard SKU history [7][5].
The Review Listing Changes dashboard keeps data for a rolling 60-day window [2]. So if you see something important, save screenshots and timestamps before it disappears.
When the SKU log has gaps, the next move is to compare Amazon’s review records with your submitted file.
Use Brand-Owner Tools and Catalog Records to Confirm What Changed
After you check SKU history, the next step is to verify Amazon-initiated edits and compare those changes with your saved file. Start with Amazon’s review dashboard. Then check the live detail page against your last clean file.
How to Check Amazon-Initiated Edits in Review Listing Changes
If you have Brand Registry access and Brand Representative permissions, go to Manage All Inventory > Review Listing Updates and open the Review Listing Changes (RLC) dashboard. This dashboard shows material updates to your brand’s catalog made by Amazon or other selling partners [2][3].
Pay close attention to the Amazon-initiated label. That tag marks edits driven by Amazon-generated changes based on catalog data. It’s the fastest way to confirm Amazon-initiated title and attribute edits. That said, it does not show images, browse nodes, pricing, or normalization-only changes [3].
You need to approve or disagree within 14 days. If you do nothing, the change goes live on its own [2][3].
How to Compare the Live Detail Page Against Your Last Submitted File
If RLC doesn’t explain the change, compare the live page with your last approved upload. Download a Category Listings Report (CLR) from Inventory > Inventory Reports to pull current live values [1][6]. Then use your last submitted flat file as the baseline and compare it against the current Category Listings Report in Excel.
Start with the fields that matter most:
- Title
- Main Image
- Category/Browse Node
- Key item attributes
This helps you spot whether the mismatch came from Amazon, another seller, or a bad upload [6].
One more thing: a listing can show as Active in Seller Central while the shopper-facing page is suppressed or shows different content [6]. That’s why date-stamped file versions matter. They let you trace when a value last matched the content you meant to publish.
Use these tools together, not one at a time.
| Tool | Location | Best Used For |
|---|---|---|
| Review Listing Changes | Manage All Inventory > Review Listing Updates | Tracking Amazon-initiated edits and changes from other sellers |
| Contribution History | Brand Registry > Support > Contribution History | Identifying which account submitted specific data updates |
| Category Listings Report | Inventory > Inventory Reports | Comparing live values against your last submitted flat file |
Identify Who Changed the Listing and What to Do Next
How to Tell Whether the Change Came from Your Team, Amazon, Another Seller, or a System Overwrite
Before you try to fix the listing, figure out who made the change. That tells you which path to take.
Use the history log, RLC, and the Category Listings Report to trace the source. Named user activity usually means someone on your team made the edit. Normalized spelling or formatting usually points to Amazon. Repeated reversions after you update the listing often mean another seller is changing it. New Adult flags, Search Suppressed status, or category shifts usually point to a system overwrite.
| Source | Common Indicators | Where to Verify | Next Step |
|---|---|---|---|
| Internal Team | Named user activity; specific upload timestamps | Seller Central > Inventory > Add Products via Upload (Processing Reports) or User Permissions | Review internal SOPs or team logs |
| Amazon-initiated | Normalized spelling or formatting | Manage All Inventory > Review Listing Changes | Use Disagree in RLC [2][3] |
| Other Sellers | Repeated reversions after you update the listing | Brand Registry > Support > Contribution History | Resubmit via flat file; escalate through Brand Registry [5] |
| Vendor Central | Seller Central edits revert after upload | Brand Registry Support / Vendor Central Catalog | Align source data and escalate through Brand Registry [5] |
| System Overwrite | Search Suppressed; marked Adult; category reassignment | Pricing Health Dashboard; Account Health Notifications | Open a case to resolve suppression or category issues [4] |
Once you spot the pattern, the next move becomes a lot clearer.
How to Restore Correct Content and Escalate When the Problem Keeps Returning
After you identify the source, go straight to the fix that fits it.
Start in Manage All Inventory. If the edit doesn’t stick, upload a flat file to create a cleaner record [1][5]. If it still flips back, use Fix a Product on the exact attribute [4].
If the issue keeps coming back, open a Seller Support case and include product photos or a manufacturer page that shows the correct data [4][5]. For Amazon-initiated edits, use Disagree in Review Listing Changes. If another source keeps overriding the content, escalate through Brand Registry and ask for a content lock or authorized submission flag [5].
There’s one more thing to watch: parent and child ASINs. If titles or attributes don’t match across the variation, Amazon may standardize the listing. Keeping variation data aligned helps cut down on repeated automated overwrites [5].
Prevent Future Listing Changes with Regular Monitoring and FlatFilePro
How to Set Up a Weekly Audit for High-Risk ASINs
After you fix a listing, check it every week so the same drift doesn’t creep back in.
Start with the ASINs that drive the most revenue. If a hero ASIN gets suppressed, sales can stall until you fix it [8]. For those SKUs, keep one master record with the approved title, bullets, images, search terms, and variation relationships. That file is your source of truth.
From there, keep the review process simple and consistent. Check suppression every day. Review live product pages weekly on mobile, then compare what you see against your source-of-truth file. That mobile check matters. Desktop previews can miss cropped images or cut-off titles.
Your weekly pass should also include broken child listings. A lot of unauthorized edits happen between 10:00 PM and 6:00 AM local time [5], so early-morning reviews can help you spot issues before they snowball.
It also helps to assign clear ownership for each task:
- who checks suppression
- who reviews live pages
- who submits fixes
- who escalates to Brand Registry when a change keeps reverting
How FlatFilePro Helps You Track Changes, Compare Versions, and Fix Issues Faster
Once manual reviews start eating up too much time, it makes sense to automate the same process.
FlatFilePro’s Reflection Engine checks your approved catalog data against what’s live on Amazon every night. That cuts the detection-to-correction window from 24–72 hours to 1–4 hours [5]. In plain English: you spot problems much sooner, which gives them less time to hurt traffic or sales.
If multiple SKUs need to be restored, one-click bulk editing lets you update them at once instead of fixing each one by hand. The Global Activity Log keeps a record of approved versions and change history, which makes rollbacks much faster. And when variation issues show up, the drag-and-drop variation manager gives you an easier way to repair broken parent-child relationships and cut down on detached child ASINs.
| Feature | Seller Central Alone | Seller Central + FlatFilePro |
|---|---|---|
| Monitoring | Manual checks across disconnected views | Reflection Engine: automated nightly checks against live Amazon data |
| Detection Window | 24–72 hours with manual review [5] | 1–4 hours with automated alerts [5] |
| Restoration Speed | Manual edit per SKU; often requires support cases [5] | One-click bulk editing across multiple listings |
| History Visibility | Fragmented change history | Global Activity Log with version control and audit trails |
| Variation Management | Complex flat files or Variation Wizard | Drag-and-drop interface for repairing parent-child relationships |
Conclusion: Confirm the Change, Find the Source, Restore the Listing, and Keep It Protected
Use the weekly audit to catch drift before it hurts traffic or conversions.
If a listing looks different from the last time you touched it, confirm what changed, compare it to your source of truth, restore the right content, and keep watching those same fields so the issue doesn’t come back.
FAQs
How can I tell who changed my listing?
Amazon doesn’t offer one clear change log in Seller Central that shows who changed your listing or when it happened. That’s because listing data can come from more than one place, not just your own edits.
If you need to dig into changes, start by comparing your internal records against the current catalog with a Category Listing Report (CLR) download.
If you’re Brand Registered, use Review Listing Changes to check Amazon-initiated updates from the last 60 days.
If you’re not Brand Registered, your best move is to cross-check older flat file uploads and any manual submissions you’ve made.
What if the change history is missing edits?
If Amazon’s change history looks incomplete, that’s probably because Seller Central doesn’t give you a full audit log for every listing update. Changes made by hand in Manage Inventory often won’t show up in any history view you can easily check.
If the built-in history doesn’t give you enough to work with, ask Seller Support for your listing’s contribution history. You can also compare the current listing against older inventory loader files, past Category Listing Reports, or search engine caches.
Why does my listing keep reverting after I fix it?
Your listing often flips back because Amazon’s catalog system, or another seller with more authority, can overwrite the data you submitted. That can change your title, bullet points, images, and other product details.
A few things usually cause this:
- Automated catalog quality updates
- Review Listing Changes suggestions that were never reviewed
- Conflicts from resellers or Brand Registry submissions
- Internal Amazon overrides
To see what’s live right now, check your Category Listing Report. If Amazon keeps rejecting your updates, contact Seller Support and ask them to Redrive the Catalog.