
If you wait days to spot a bad ASIN edit, you can lose traffic, ads, reviews, and sales before you even know what changed. I’d treat listing history as the first place to check because it shows when a field changed, what changed, and helps me prove whether the edit came from my team, Amazon, or another seller.
Here’s the short version:
- Offer hijacks and listing edits are not the same problem.
- I’d watch the fields that can hurt search and conversion first: title, brand, main image, bullets, category, backend terms, and variations.
- The article shows how to confirm edits in Seller Central, compare them against saved catalog records, and send Amazon a case file with screenshots, timestamps, and ASIN-level proof.
- It also explains how to restore the listing with a clean flat-file upload and how to route the issue through Brand Registry.
- The cost of delay is high: the article notes that sellers may take 4.2 days to spot a hijack, while tracking can cut that to 1–4 hours. It also points to a possible 40% overnight sales drop after one bad title edit.
What stood out to me is the article’s simple workflow: monitor, confirm, document, restore. That is the core idea.
If I were boiling the full piece down into one plain takeaway, it would be this: save a baseline of your listing, watch for changes daily, and keep proof ready before you open a case.
A few points the article makes clear:
- A brand swap to “Generic” can hurt discoverability and trigger suppression.
- A category move, like being pushed into “Adult,” can block ads and limit search visibility.
- Broken variation families can split reviews or attach unrelated child ASINs.
- Counterfeit complaints tied to a bad offer can hit account health hard, with only a 3-day fix window in some cases.
Bottom line: I’d use listing history as an early warning log, not just a record after the damage is done.
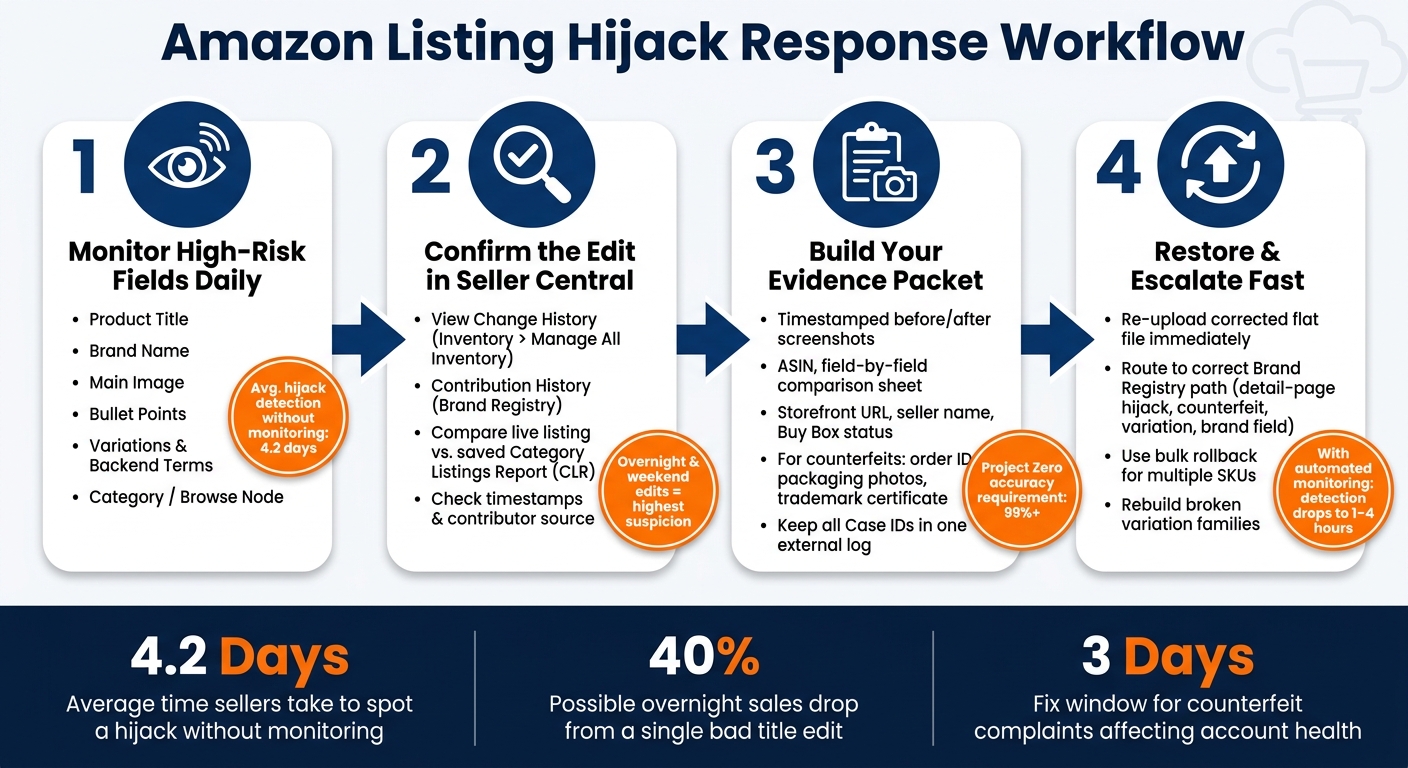
Amazon Listing Hijack Response: Monitor, Confirm, Document, Restore
How To Remove Amazon Hijackers & Unauthorized Sellers
sbb-itb-ed4fa17
Which listing fields to monitor for hijacker activity
Not every field on your listing carries the same level of risk. Focus first on the ones that can hit search visibility, conversion, or your variation setup.
High-risk fields: title, brand, bullets, images, and variations
Product title should be at the top of your watch list. A bad change here can tank keyword indexing and traffic fast.
Brand name comes next. Hijackers may switch the brand to "Generic" or replace it with a lookalike name to take control. That can make it harder for repeat buyers to find your product and can increase the chance of listing suppression.
Main image changes are obvious to shoppers right away, which is why they can do damage so fast. If someone replaces the hero image with a lower-quality photo, a different product, or a placeholder, your click-through rate and conversion can drop. It can also lead to search suppression.
Bullet points and description are easier to miss, but they still matter. Bad actors often slip in restricted compliance terms so the listing gets flagged or limited by compliance bots.
Variation structure is another area where things can go sideways fast. If a variation family gets broken, child ASINs can become orphaned and lose shared reviews. And when unrelated child ASINs get merged into a high-review parent, another product can ride on review trust it didn’t earn.
You should also keep an eye on backend search terms and product category (browse node). If the category drifts into an unrelated node, you can lose Best Seller Rank and search visibility.
Normal updates vs. suspicious edits: how to tell the difference
The easiest way to spot trouble is to look at timing and edit type together. Normal updates usually happen after a known upload or Brand Registry action. Hijacks often show up overnight or over the weekend, out of nowhere.
| Field | Normal Update | Suspicious Edit |
|---|---|---|
| Title | Seasonal keyword added; brand name prefix adjusted | Optimized terms replaced with generic text or irrelevant keywords |
| Brand | Minor capitalization or punctuation fix | Changed to "Generic" or a different brand entity entirely |
| Main Image | Higher-resolution re-shoot; lifestyle photo added | Swapped for a different product, low-quality mobile snap, or placeholder |
| Bullets | Copy refined based on customer feedback | Replaced with weak copy; restricted compliance terms inserted |
| Category | Moved to a more specific sub-category | Sudden shift to an unrelated node |
| Variations | New color or size added to existing family | Family broken; unrelated child ASINs merged into parent |
| Timing | Business hours; follows a known upload or submission | Overnight or weekend, with no corresponding seller action |
If something looks off, check the contributor and timestamp in Seller Central before you put the old version back.
How to confirm tampering using Seller Central and catalog records
After you spot a suspicious edit to your title, brand, bullets, images, or variations, switch from detection to proof right away. The goal is simple: confirm the edit and document the exact change.
Use contribution views and timestamps to trace who changed what
Seller Central gives you two main tools to see what changed and when.
Start with View Change History. Go to Inventory > Manage All Inventory, click the dropdown arrow next to the Edit button for the ASIN, and choose View Change History. This view shows edits to titles, bullets, images, and descriptions. [6]
If you’re a Brand Registered seller, also review Contribution History under Brand Registry > Support > Contribution History. This can help you see whether Amazon-made edits or another seller’s contribution supplied the version Amazon accepted. [6]
Amazon may accept competing contributions for the same ASIN. So the live version can differ from your original content.
Next, match those timestamps against any spikes in Voice of the Customer (VOC) complaints, especially "wrong item" or "counterfeit" reports. Before you change anything, save screenshots that show the offer state, seller name, Buy Box status, and U.S. date and time. [3]
If the source still isn’t clear, compare the live record with your saved catalog baseline.
Compare flat-file exports and prior catalog snapshots
Use a saved Category Listings Report to check the live listing against your baseline, field by field. [6]
No prior CLR saved? Then review your flat-file upload history and submission reports. Those records show what data was submitted and when. That makes it easier to spot whether a bulk overwrite caused the issue. [6]
A side-by-side spreadsheet works well here. Compare the title, brand, and other key fields, then save that file as part of your evidence packet.
Restore the listing with a clean catalog submission
Once you’ve confirmed the mismatch, restore the approved data at once. Re-upload a corrected Amazon flat file using your approved catalog data. Flat-file validation can catch errors that the Seller Central UI may miss. [9]
| Tool | Best For | Use |
|---|---|---|
| View Change History | Detection | Edits to titles, bullets, images, descriptions [6] |
| Contribution History | Proof | Amazon-initiated and another seller’s contributions [6] |
| Category Listings Report (CLR) | Detection & Proof | Baseline snapshot for field-by-field comparison [8] |
| Flat-File Submission Reports | Proof & Restoration | Validation errors and field-level submission history [9] |
Keep every Case ID in one external log so you have a clean timeline. Then use that same evidence set when you escalate through Brand Registry.
How to escalate with Brand Registry using solid evidence
Once you’ve confirmed the mismatch, pull everything into one case file and send it through the Brand Registry route that fits the issue.
Build an evidence packet Amazon can act on quickly
Make it easy for Amazon to review. You can also automate your Amazon store backup to ensure you always have historical data ready for these evidence packets. Your packet should include the ASIN, the fields that changed, timestamped before-and-after screenshots, a field-by-field comparison sheet, the storefront URL, seller name, price, fulfillment method, and Buy Box status.
For counterfeit cases, add more proof: the order ID, shipping-label photos, packaging photos, and a side-by-side product comparison. You should also keep a brand-ownership file with your trademark certificate, Brand Registry approval email, and manufacturer invoices.
If a hijacker changed your brand field, the backend brand ID may be corrupted or overwritten. Note that clearly in the packet and use precise technical wording when you escalate.
Match the issue to the right reporting path
After the file is ready, send it to the queue that handles that issue type.
| Tampering Type | Evidence Required | Reporting Action |
|---|---|---|
| Detail-page hijack (title, bullets, images) | Before/after screenshots, Contribution History, Brand Catalog Lock status. | Seller Central Report Abuse → "Product detail page was changed to represent a different product" [11] |
| Counterfeit offer hijack | Test-buy order ID, shipping-label photos, packaging photos, side-by-side comparison, trademark certificate. | Brand Registry Report a Violation or Project Zero if eligible [10][7] |
| Variation hijack (ASIN merging) | Screenshots of the incorrect variation family, parent/child ASIN list, review mismatch evidence. | Seller Central Report Abuse via the product-detail-page tampering path [11][7] |
| Brand field hijack (ownership hijack) | Trademark registration, original approval email, backend brand ID error proof. | Senior escalation via your primary account email; request decoupling of the conflicting brand assignment. Use exact brand-ownership language so the case reaches the right internal team. [5] |
If you use Project Zero for self-service counterfeit removals, your reports need to be airtight. Drop below a 99% accuracy rate, and Amazon can permanently revoke self-service access [4].
Set up ongoing protection with FlatFilePro and a fast-response workflow
Once you’ve confirmed tampering, the next move is simple: stop the next bad edit from sitting unnoticed. Continuous monitoring helps you catch hijacks before they spread.
Use the Reflection Engine to catch live listing changes nightly
FlatFilePro’s Reflection Engine runs automated nightly comparisons between your saved baseline and the live listing. It marks clean fields in green and changed fields in red, so your team can spot problems fast.
This matters even more after hours, when a larger share of listing edits tends to happen.[1] With automated nightly monitoring, the detection window drops to 1–4 hours.[1] That gives your team a short, workable window to document the issue and respond before ranking damage stacks up.
Use activity logs, bulk edits, and variation tools to recover faster
After detection, speed matters. Use activity logs to confirm the prior value, bulk edits to restore multiple SKUs in one pass, and the variation manager to rebuild broken families fast.
With a clean baseline in place, recovery gets much less painful. Here’s how Seller Central compares with automated monitoring:
| Capability | Native Amazon Tools (Seller Central) | FlatFilePro |
|---|---|---|
| Monitoring frequency | Manual, reactive [1] | Automated nightly checks [1] |
| Change history | Per-listing "View Change History" only [2] | Catalog-wide version history and snapshots [1] |
| Alerting | No alerts for most content edits [1] | Visual flags across all monitored SKUs [1] |
| Restoration | Manual one-by-one edits [1] | Bulk rollback via stored baselines [6] |
| Variation support | Manual audit of child listings [1] | Automated detection of family breakage [6] |
Conclusion: Catch early, document clearly, restore fast
The process comes down to three steps: monitor the right fields, verify changes with hard evidence, and restore fast before ranking damage compounds. Faster response to content changes helps protect sales and Buy Box ownership.
Start with your top-revenue ASINs. Keep your evidence log up to date. Then make sure the team knows to act on alerts right away.
FAQs
How often should I check listing history?
Unauthorized changes can happen at any time. That makes manual checks hard to scale and weak at stopping revenue loss on their own.
Some sellers look over core ASINs every day or once a week, usually based on how much revenue those listings bring in. That can help, but continuous, real-time monitoring is the surest way to spot changes fast and act before tampering does lasting damage.
What proof should I gather before opening a case?
Act fast and gather proof while the unauthorized changes are still live. Pull together:
- ASIN details, seller name, price, fulfillment method, and Buy Box status
- Timestamped screenshots of changed titles, bullets, images, brand fields, and A+ content
- A before-and-after view of the listing, plus any sales or Featured Offer drops and relevant customer reviews
- Trademark records, packaging photos, authorized seller records, and any test-buy photos
Keep everything clear and tight so your report is easy to act on and doesn’t lead to extra back-and-forth.
What should I restore first after a hijack?
First, document the issue with screenshots of the current offer, seller details, and any unauthorized content changes.
Then restore the product title first because it has the biggest impact on keyword indexing and search visibility. After that, fix the images, bullet points, and A+ content. Use listing change history to spot unauthorized edits and roll them back.