Are you a business owner looking to maximize your sales on Amazon? Then you must learn the very basic step of how to add product to Amazon. In this article, we guide you step by step to creating Amazon listings to sell your products.
We’ll discuss three different ways to add new Amazon product listings: adding to an existing listing, adding individual listings, and bulk uploads. So read on, and let’s learn together how to add product to Amazon Seller Central.
Table of Contents
How to Create Amazon Seller Central Account
Amazon Seller Central is an online platform that allows merchants to list and manage their products on the Amazon marketplace. It provides tools for managing inventory, orders, customer service, promotions, and more.
With Seller Central, you can create a professional-looking storefront to showcase your products and reach millions of potential customers around the world.
How to Create an Account
Creating an account with Amazon Seller Central is simple. First, visit sellercentral.amazon.com and click “Sign Up Now” in the top right corner of the page.
You will be asked to provide some basic information about yourself such as name, address, and phone number. You will need to enter payment details so that Amazon can process payments from buyers who purchase your items through their site.
Once this information has been entered correctly, you will be able to access all of the features available within Seller Central including listing new items for sale or creating promotional campaigns for existing ones.
Setting up Your Storefront
Once your account has been created it’s time to set up your storefront! This includes adding product images and descriptions as well as setting prices for each item listed on your storefront page.
Additionally, there are various customization options available such as changing colors and fonts used throughout the store or adding banners and logos at certain points. This helps make sure visitors recognize who they’re buying from when browsing through listings!
How to Add Product to Amazon: Adding to Existing Listings
One way how to add product to Amazon is to add to existing listings. This is a great way for resellers to increase their inventory and expand their business. To do this, you’ll need the ASIN (Amazon Standard Identification Number) of the product you want to add.
Search for the ASIN of the Existing Product
The first step in adding an existing product is finding its ASIN number.
This can be done by searching for the item in Seller Central or Amazon Marketplace. Once you have found the item’s ASIN, copy it so that it can be used later on in this process.
Search for the ASIN in Seller Central
After copying down the item’s ASIN number, go back into Seller Central and search for it again using either its name or its SKU code if available. Once located, click on “Sell Yours” next to where it says “Add Product Details” at the top right corner of your screen.
Choose the Condition of the Item and Click On “Sell This Product”
On this page, select which condition best describes your product from the New, Used, and Refurbished options given. Click on the “Sell This Product” button at the bottom right corner of the page.
Set Selling Price
Now set up a competitive selling price based on research conducted prior. Keep in mind the shipping costs and other fees associated with the sale.
Choose Whether Fulfilled By Merchant Or Fulfilled By Amazon
Finally, decide whether fulfillment should be handled by the merchant (FBM) or through Amazon (FBA). If opting for the latter option, make sure pricing reflects additional fees associated with storage and delivery services provided by Amazon.
(Source)
How to Add Product to Amazon: Unique Listings
If you have new products that are now on Amazon yet, there are a few simple steps to follow to create your listing. Here are the steps on how to add products to Amazon that are unique.
Click on “Add Product” in Seller Central
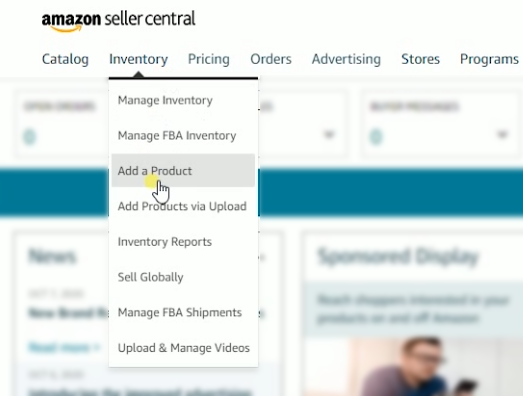
To add a new product to Amazon, start by logging into your Seller Central account. Once logged in, click on the “Inventory” tab at the top of the page and then select “Add a Product” from the drop-down menu.
This will open up an interface where you can enter all of your product information including title, description, images, pricing, and more.
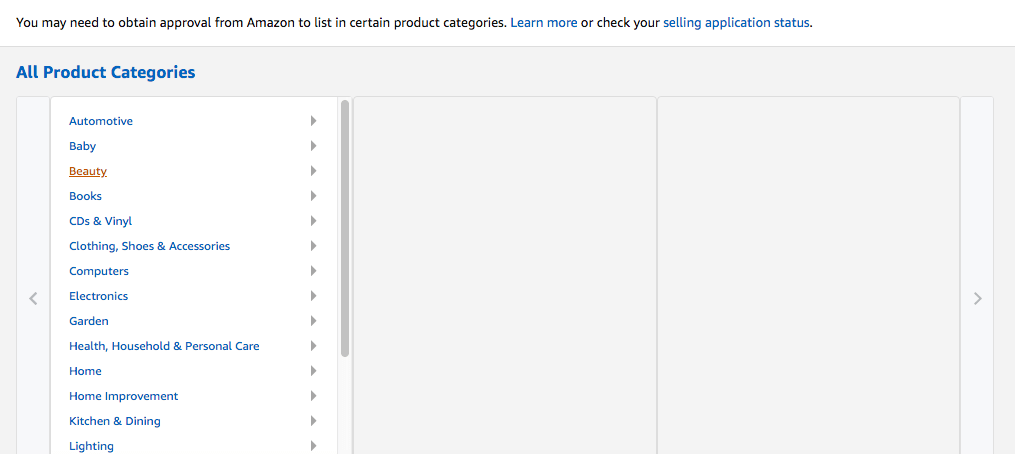
Choose Product Category
After clicking “Add Product” you will need to choose which category best fits your item from the list provided by Amazon. You may also need to provide additional details about what type of item it is (i.e., book or toy).
Make sure that you are as accurate as possible when selecting categories so that customers can easily find your products when searching for them online.
Fill In Product Information
Once you have chosen a category for your item, it’s time to fill out all of its relevant information such as title, description, and images if applicable. Make sure they meet Amazon’s image requirements.
Additionally, include any other important details such as size or color options if necessary before submitting everything for review by Amazon.\
(Source)
How to Add Product to Amazon: Bulk Listing
Adding products to Amazon via bulk listing is a great way to save time and streamline your product listings. Here’s how you can do it:
Click on “Add Products via Upload” in Seller Central
To get started, log into your Amazon Seller Central account and click the “Inventory” tab at the top of the page. Then, select “Add Products via Upload” from the drop-down menu.
This will open up a new window with all of your available options for uploading products.
Choose Category and Template Type
Next, choose which category best fits your product or products that you are trying to list.
Once you have selected a category, pick which template type works best for what you are trying to upload (e.g., Standard Item Entry Template).
Open Template in a Spreadsheet App
After selecting the appropriate template type, download it onto your computer by clicking on the “Download Now” button located next to it. The file should be saved as an Excel spreadsheet (.xlsx) format so make sure that whatever program you use is compatible with this file type before opening it up.
Read through the template directions before doing anything. Amazon has a detailed guide that comes with the template, so make use of it.
Fill the Template With Product Information
Now that you have opened up the template in an appropriate application (e.g., Microsoft Excel), fill out each column according to the instructions provided by Amazon Seller Central. Make sure all information is accurate and double-check everything.
Upload File to Amazon Seller Central
After filling in the template, go back into Amazon Seller Central and select “Upload Your Inventory File” from within Add Products Via Upload section.
You will then be prompted with another window where can browse for your previously downloaded inventory file containing all of the product information filled out earlier. Select this file, review its contents one last time, then hit submit. You have now successfully added multiple items using the Bulk Listing feature offered by Amazon Seller Central!
Conclusion
Learning how to add product to Amazon can be a great way to increase your business’s visibility and reach. With the right strategies, tools, and steps in place, you can maximize the potential of your product listings on Amazon.
By taking advantage of these resources and following best practices for listing optimization, you can ensure that your product listings are successful when you add products to amazon.
Are you looking for an efficient way to manage your Amazon listings? Look no further! FlatFilePro is a SaaS software designed specifically for listing management on the world’s largest online marketplace.
Our easy-to-use platform simplifies and streamlines product entry, giving you more time to focus on growing your business. With our intuitive tools and features, it’s never been easier or faster to add products to Amazon. Try out FlatFilePro today – start adding products with ease!


