
If your Amazon listing changes without warning, I’d check three places first: Seller Central change records, flat file snapshots, and alert-based monitoring. That gives me the fastest path to see what changed, when it changed, and whether the edit lines up with a drop in traffic, conversion, or Buy Box status.
Here’s the short version:
- I use Review Listing Changes for recent SKU-level edits, usually within the last 60 days
- I use Category Listing Reports to compare old vs. current catalog data across many SKUs
- I keep an internal log by SKU, ASIN, field changed, old value, new value, source, and timestamp
- I watch for high-risk changes first: title, main image, category, variation links, suppression, and price
- If edits keep getting overwritten, I check Contribution History to see who submitted the update
Amazon’s catalog is shared, so the live page can change even when my saved file does not. That’s why simple spot checks are not enough for many sellers.
What I’d focus on first:
- Verify the edit
- Find the source
- Fix the live listing
- Track repeat overrides
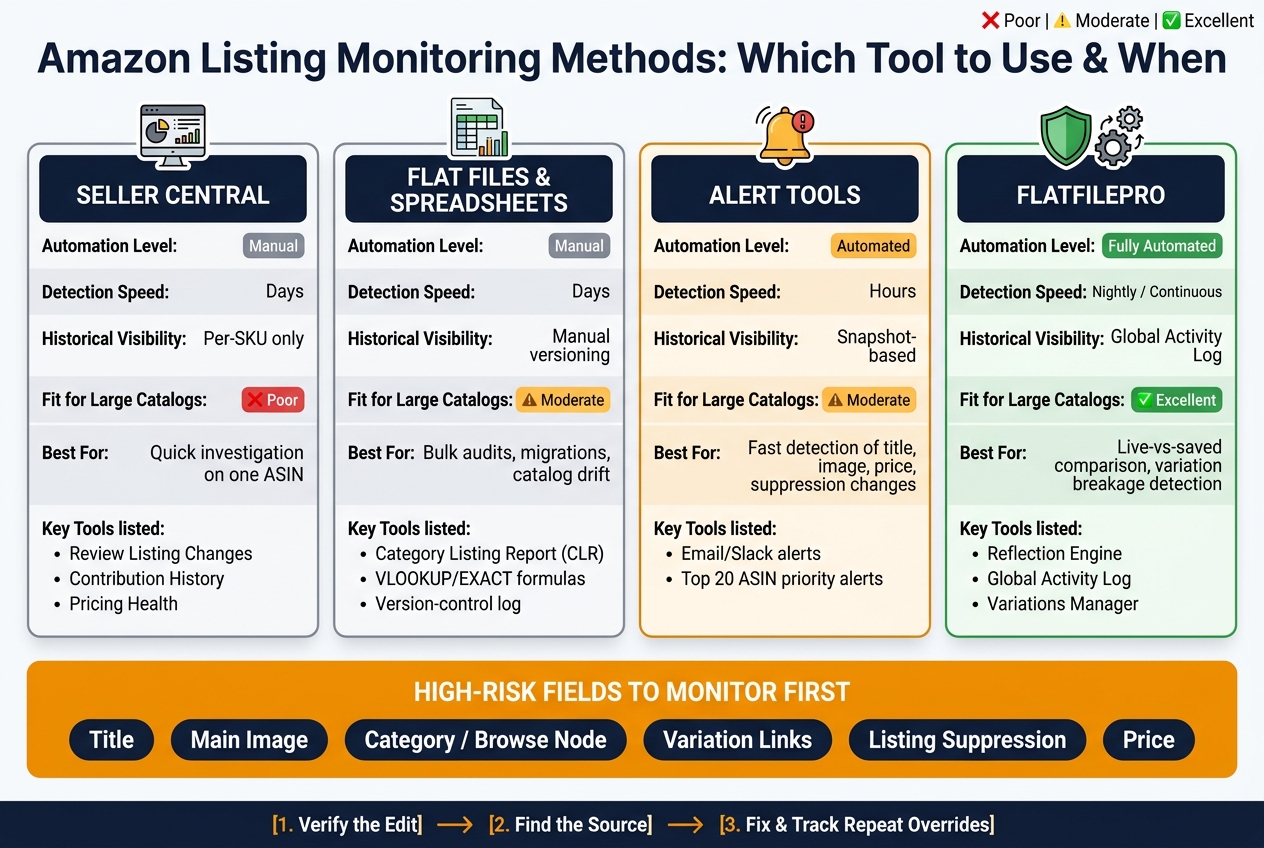
A quick side-by-side view helps:
| Method | Best for | What I can see | Main limit |
|---|---|---|---|
| Seller Central records | One SKU | Recent field edits and status issues | Short lookback, limited fields |
| Flat file snapshots | Many SKUs | Catalog-level field changes | Manual comparison work |
| Alert tools | Fast detection | Change notices for key fields | May not show full field-level detail |
If I were setting this up today, I’d start with my top-selling ASINs, save dated exports, and review alerts daily. That keeps the process simple and cuts down the time between a bad edit and a fix.
This article walks through that workflow in plain English, without adding extra steps that don’t help.
Amazon Listing Monitoring Methods: Which Tool to Use & When
Amazon AI Listing Changes Auto Publish After 14 Days
sbb-itb-ed4fa17
How to check listing change history in Seller Central

When the live listing no longer matches the catalog data you saved, Seller Central is the first place to check. In most cases, two views do the heavy lifting: Review Listing Changes and Manage Inventory > Edit. Together, they help you see what changed, when it changed, and whether the update came from Amazon or another seller.
Use Review Listing Changes to investigate a single SKU
Go to Manage All Inventory > Review Listing Changes first. This dashboard shows Amazon and third-party edits from the past 60 days [3][6]. It covers title, bullet, and attribute edits, but it does not track images, browse nodes, or pricing [6].
Open the SKU you want to inspect, and you’ll get a side-by-side view of the old and new values, plus a timestamp. That makes it much easier to spot the exact field that moved. You’ll also see AI suggestions here, and those need review within 14 days or they publish automatically [3][6].
Use this view when you want to pin down one edit before you start checking broader listing records or older exports.
Use listing status and contribution records to confirm the impact of a change
After that, use Manage Inventory to confirm what the change did, and Contribution History to figure out who pushed it through.
In Manage Inventory, check whether the SKU is marked Active, Search Suppressed, Inactive, or under a Pricing Alert. This tells you if the update affected listing status or visibility. If the listing is suppressed, the Edit screen will often spell out the reason, like a non-compliant image or a missing required attribute [1].
If your edits keep getting overwritten, Brand Registry sellers should check Brand Registry > Support > Contribution History. This record shows which party submitted the latest content update – your brand, Amazon, or another contributor [1][5]. In plain English, it can show when someone with more authority on the ASIN keeps overriding your version.
If the issue is Buy Box loss after a price move, go to Pricing > Pricing Health. That view can show whether a Fair Pricing alert or a price threshold problem caused the Featured Offer to vanish [2].
| Record / Tool | Location in Seller Central | Primary Use |
|---|---|---|
| Review Listing Changes | Manage All Inventory > Review Listing Changes | Track Amazon-initiated edits and AI suggestions |
| Contribution History | Brand Registry > Support | Identify who influenced a content change |
| Pricing Health | Pricing > Pricing Health | Diagnose Buy Box loss and Fair Pricing alerts |
If Seller Central still doesn’t give you the full picture, the next step is to compare exported file versions.
How to compare listing versions using flat files and internal logs
Flat file exports and internal logs help you monitor an entire catalog, not just one listing at a time. They make the most sense when a change affects multiple SKUs or when the same issue keeps coming back.
Export Category Listings Reports and compare old vs. new snapshots
The Category Listing Report (CLR) – sometimes shown as "Categorization Report" in the dropdown – is Amazon’s strongest export for catalog snapshots. It includes titles, bullets, backend keywords, hidden attributes, and variation attributes that may not show up in the Seller Central UI [7][9].
To get it, go to Reports > Inventory Reports, choose the Category Listing Report, and download the file. If you don’t see that option, open a support case and ask Amazon to turn it on for your account [7]. After you download it, unprotect the sheet before you start comparing files [7].
Save each export as a dated snapshot. Then compare one snapshot against the next with VLOOKUP or EXACT formulas so you can spot any field that changed. Start with the columns that matter most:
- product title
- main image
- category or browse node
- variation themes
- backend keywords
Also watch fields like Is it an adult product and Heat sensitive. A bad value there can lead to search suppression or meltable policy problems [9]. Once you have a snapshot system in place, run comparisons after every bulk update.
Build a spreadsheet version-control log by SKU and ASIN
A version-control log shows who changed what and when. That’s how teams trace repeat overrides and keep accountability clear across a large catalog.
Set up the workbook with at least three tabs: a raw tracking sheet, a summary dashboard, and an actions tab. The raw sheet should include SKU, ASIN, changed field, old value, new value, source, user, and timestamp in MM/DD/YYYY HH:MM format [5][2]. In the summary dashboard, roll up metrics like total fields changed and keywords improved vs. declined [4]. Use the actions tab to assign fixes to team members and set a target date.
Use conditional formatting so the log is easy to scan – green for intended updates, red for unauthorized or negative changes [4]. When drift keeps showing up, that kind of record makes the pattern much easier to catch before performance takes a hit.
Single-SKU checks vs. catalog-wide tracking
The right method depends on how large your catalog is and how often your listings change.
| Method | Scale | Data Completeness | Best Use Case |
|---|---|---|---|
| Seller Central Change History | Single SKU | Recent edits only | Quick investigation on one ASIN |
| Flat File (CLR) Comparison | Catalog-wide | Full attribute-level visibility | Bulk audits, migrations, and catching catalog drift [8] |
| Spreadsheet Version Log | Catalog-wide | Includes internal context: user, source, and timeline | Building a repeatable audit trail for ops teams and agencies [4] |
The CLR and the version log do different jobs. The CLR shows what drifted. The log shows the pattern over time, which helps you catch repeat issues before they stack up.
How to automate listing monitoring with alerts and catalog management tools
Scheduled checks are fine for planned reviews. But they can miss a Wednesday-night edit that sits there until Friday. That gap matters.
Automated monitoring helps close it. Manual snapshot checks and flat file audits still have a place, but alerts help you spot listing drift while it’s happening instead of after the damage is done.
Set up alerts for title, image, price, and category changes
Start with the changes that can hurt you fast: title, image, price, category, suppression, and variation updates.
Set high-priority alerts for:
- Title changes
- Main image swaps
- Buy Box loss
- Listing suppression
Leave lower-impact updates out of your critical alert flow. If every small tweak triggers a message, people stop paying attention. That’s how alert fatigue creeps in. Send alerts to email or Slack so your team can act right away [1].
The biggest risk usually shows up overnight and on weekends, when edits can slip through unnoticed. A smart place to start is your top 20 ASINs by revenue. If a high-volume ASIN gets an unnoticed title change, you may end up spending more on ads just to win back rankings [1].
Use FlatFilePro to track live-vs-saved listing differences
Alerts tell you something changed. A live-vs-saved comparison shows what changed.
FlatFilePro compares your saved catalog data against the live listing and flags each mismatch. Its Reflection Engine runs nightly comparisons, showing matches in green and mismatches in red. That makes it much easier to scan a big catalog without opening ASINs one by one. It can catch silent edits from Amazon, retail overrides, or other contributors [5][2].
The Global Activity Log records each change with a timestamp. That gives you a version history you can use for Brand Registry escalations and for showing exactly when a listing started to drift [5][2]. FlatFilePro also flags broken parent-child relationships and variation corruption, both of which can lead to review dilution or orphaned listings [5].
Native, spreadsheet, and automated monitoring workflows compared
Use the lightest workflow that still catches changes fast enough for your catalog.
| Workflow | Automation Level | Detection Speed | Historical Visibility | Fit for Large Catalogs |
|---|---|---|---|---|
| Seller Central | Manual | Days | Per-SKU only | Poor |
| Spreadsheet / Flat Files | Manual | Days | Manual versioning | Moderate |
| Alert Tools | Automated | Hours [1] | Snapshot-based | Moderate |
| FlatFilePro | Fully automated | Nightly / continuous | Global Activity Log | Excellent |
The main win here is speed. Automation can cut detection time from days to hours, which gives you a much better shot at fixing listing drift before it affects search visibility or catalog accuracy.
How to respond to listing edits, suppressions, and variation breakages
How to investigate listing edits and suppressed content triggers
Once you spot a change, the next step is simple: figure out what changed and why.
After an alert comes in, go to Manage Inventory > Edit. Then compare the live listing with your approved title, bullet points, and backend keywords. Look for suppression reasons, missing attributes, or backend search terms that suddenly changed or went blank.
If the listing is suppressed, check the copy for restricted terms that may have triggered the issue. Then resubmit the corrected version. If Amazon changes it back again, escalate through Brand Registry.
One thing trips up a lot of sellers: a listing can still show as Active in Seller Central while the live page is already losing traffic and conversions.
How to find and fix broken parent-child relationships
Sometimes the problem isn’t the copy. It’s the structure.
When that happens, inspect the variation family.
Variation breakages are easy to miss because a child ASIN can still look active in Seller Central even after it has been orphaned. The most common causes are catalog merges, retail overrides, and data from another marketplace overwriting U.S. fields [5]. If you notice child ASINs with title formatting that doesn’t match, take that as a warning sign. Amazon may try to "correct" the data, and that can push unwanted changes across the whole variation family [1].
Use change history to find when the break started. Then rebuild the parent-child relationship in Variation Wizard. If the fix keeps getting reversed, escalate through Brand Registry just as you would for a content override.
If you’re using FlatFilePro, the Reflection Engine helps you compare live data against your saved version. The Variations Manager can also make rebuilding the right parent-child relationship much easier.
Conclusion: Build a monitoring routine that protects catalog accuracy
Use the same three checks each time:
- Verify the edit
- Confirm the cause
- Restore the correct version
Seller Central works well for fast, per-SKU checks. Flat file exports and version-control spreadsheets give you a record you can compare over time. Automated tools help cover the gap between scheduled reviews and live changes, cutting the detection window from a 24- to 72-hour manual gap to 1 to 4 hours [1].
A steady monitoring routine helps you catch drift early, limit performance damage, and keep catalog data under control.
FAQs
How often should I check listing changes?
Use a set review schedule and automated alerts to catch unauthorized changes in real time. Check pricing and inventory daily. Audit descriptions, images, and variations weekly. Review overall listing performance monthly.
Manual checks alone don’t scale. And in many cases, they show problems only after those issues have already hurt search visibility, conversion rates, and revenue.
What should I monitor first on my top ASINs?
For your top ASINs, start by tracking the changes that hit sales and visibility the hardest: price, inventory, and Buy Box status.
After that, keep a close eye on listing content. Put extra focus on titles and main images first. Then check variation relationships, category nodes, and bullet points. That helps you spot indexing issues, suppression risks, compliance flags, or listing drift before they turn into bigger problems.
How can I prove who changed my listing?
It can be tough because Amazon doesn’t give sellers one single, fully transparent change log.
Check Contribution History in Brand Registry and the Listing Change History tool in Seller Central. Those tools can show timestamps, the user or system behind the edit, and the before-and-after values.
If that still doesn’t give you the full picture, compare older flat file records or inventory reports against the current listing. That side-by-side check can help you spot unauthorized changes.